
![]()
Showcase of P2P HLS streaming using WebTorrent
This project is a Proof-of-Concept about how to distribute HLS streams in a P2P way using WebTorrent. This is not a replacement of using a HLS stream server, but instead complements them to reduce server costs by offloading server bandwidth usage to the peers.
HTTP Live Streaming is based on the
HLS clients doing plain GET HTTP requests of stream fragments. These ones
doesn't change over time, so it's possible to use "fragment" files on a CDN or a
static web server instead of a regular one and reduce costs. But also in that
case, all requests will go to them and there will be network costs. By taking a
P2P aproach, it's possible to serve these fragment files the same way any P2P
filesharing application would do, reducing network costs by fetching them from
other users that have already got them. In this case, the P2P protocol being
used is BitTorrent, and more specifically the
WebTorrent implementation, that allow to use it in web
browsers.
This proof-of-concept has five diferenciated components:
hls/ folder and automatically deletes the old ones.For testing purposes, stream is just a video test card, being the generator
script available at scripts/generate-video.sh.
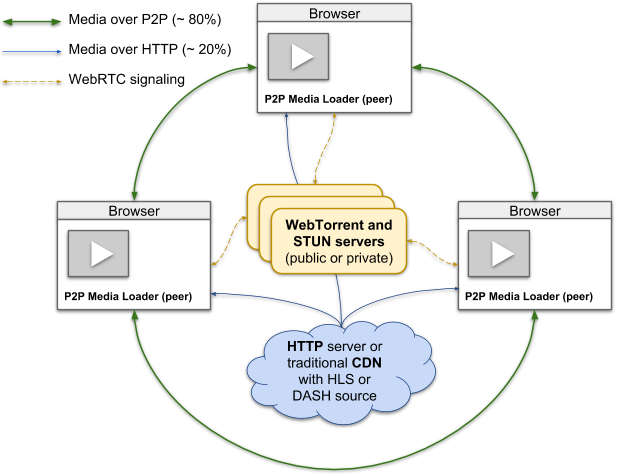
P2P Media Loader starts downloading the stream fragments from the HLS stream, that's using a HTTP server or a CDN. At the same time, it connects to the WebTorrent tracker using WebSockets to exchange the WebRTC SDPs to create connections with the other peers, and start using the BitTorrent protocol to find other peers and ask for missing stream fragments. In case a P2P connection can't be stablished, or no one of the other peers has the missing fragments, they will still be fetched using regular HLS instead.
When the playing of the HLS stream starts, it first pick the stream fragments from the HTTP server or CDN, and at the same time, it ask in advance for other stream fragments to other peers in the WebTorrent network. The P2P management and transmission is fully done on client side, so it's transparent to the HLS streams used as source.
wt-tracker needs to be configured first, so run it with:
docker run \
  -it
  -p 49199
  -v "$(pwd)"/config.json:/app/config.json:ro \
  heliosh2020/p2p-mediastream
config.json file must have a content similar to:
{
  "servers":
  [
    {
      "server":
      {
        "host": "0.0.0.0",
        "port": 49199
      },
      "websockets":
      {
        "compression": 1,
        "idleTimeout": 240,
        "maxConnections": 0,
        "maxPayloadLength": 65536,
        "path": "/*"
      }
    }
  ],
  "tracker":
  {
    "announceInterval": 120,
    "maxOffers": 20
  }
}
For more configuration details and customization, take a look on wt-tracker configuration.
After installing, npm start will start the wt-tracker instance and serve the
client. To run instead the test card generator and a development build of the
client, just exec npm run dev instead. In addition to that, a couple of
systemd service files are included, one for the wt-tracker and another for
the test card generator. Just enable them and you are ready to go.
The <video> tag of this PoC has both the autoplay and muted attributes
because since Chrome 66, videos with sound are prevented to autoplay by default
to prevent annoy users. You can find more info at
https://stackoverflow.com/a/49822987/586382 and
https://developers.google.com/web/updates/2017/09/autoplay-policy-changes.
Video test card is using
lavfi,
the Libavfilter input virtual device. More specifically, it's using the
testsrc filter. For example, to create a 10 seconds 1280x720px video at 30fps,
just only exec:
ffmpeg -f lavfi -i testsrc=duration=10:size=1280x720:rate=30 testsrc.mpg